Article|TSD-09A
A Little Steel Through the Sawcut Is Not as Harmless as the Table Says
ACI 360R-10 backs its 0.1% limit for "enhanced aggregate interlock" with a table that answers a different question from the one the joints ask.
The Slab Designer, LLC | Published October 30, 2026 | Revised November 4, 2026
ACI 360R-10 has a line in it that I agree with completely: "Reinforcement will not prevent cracking, but will actually increase crack frequency while reducing crack widths." See, I'm not all negative on the guide. But hold onto that sentence, because this article is about what happens when steel meets a joint.
If you build warehouse and industrial floors, you've probably seen a detail that runs a light mat of continuous rebar, lapped so it never breaks, straight through the sawcut contraction joints in both directions. The idea is simple. Dowels cost money and take time to install. If light steel crosses each sawcut, it should hold the two sides of the crack together so the rough faces of the crack keep carrying wheel loads from one panel to the next.
ACI 360R-10, the American Concrete Institute's guide to slab-on-ground design, calls this "enhanced aggregate interlock." It allows the detail with 0.1% steel (a #3 bar every 18 inches in a 6-inch slab, or every 16 inches in a 7-inch slab) and warns against using more, because heavier steel keeps joints from opening and can lead to random cracking between joints. To back that up, the guide includes a table, Table 6.2, taken from a 1975 reinforced concrete textbook by Park and Paulay. The table says 0.1% steel reduces concrete shrinkage by less than 3%, which the guide calls minor compared with the drag of the base and slab curling.
I checked the math, and it is correct. Every number in the table can be reproduced. The problem is that the table answers a different question from the one a slab designer or contractor is actually asking. That doesn't mean these floors fail. It means the math behind the detail doesn't describe the joints, and the safety factor quietly makes up the difference.
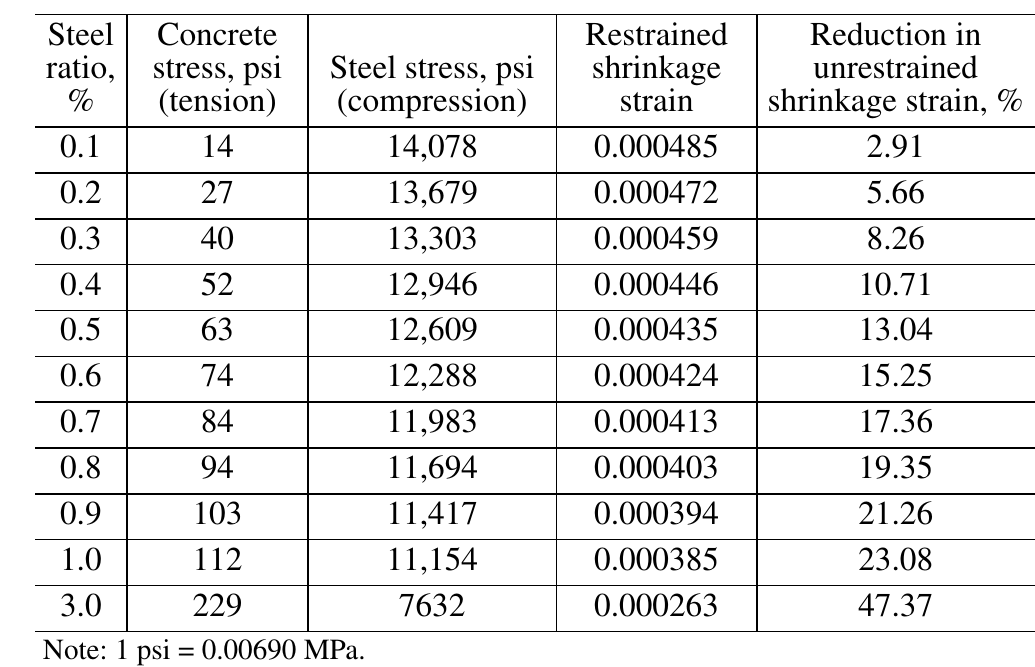
The guide already expects joints that do not open
The same section of ACI 360R-10 that relies on the table says a good deal about restraint. It requires a doweled joint at least every 125 feet (38 m), "to force activation at these joints when the other joints with the deformed reinforcement do not activate." It warns that more steel would "restrain joints from opening" and cause random cracking. And it describes "dominant joints," the few joints that open wide while their neighbors stay tight, and says vapor retarders make them worse.
That is field experience talking, and it is right. But it describes steel that restrains the joints a great deal, sitting right next to a table that says the restraint is minor. Both cannot be true, and the rest of this article explains why the field experience is the one to believe.
A calculation for a slab that has no joints
The textbook solution looks at a piece of concrete with steel in it that is uncracked, has no joints, and is not touching anything. As the concrete dries and shrinks, the steel pushes back a little, and the two materials shorten together. The table reports how much less the concrete shrinks because of the steel.
A floor slab is nothing like that. It has sawcuts every 15 feet (4.6 m) or so, there so the slab cracks at them. Once a sawcut cracks, apart from the rough crack faces bearing on each other, the steel is the only thing tying the two panels together. And the slab sits on a base that drags on it every time it moves.
Think of it like rating a tow strap by how much it stretches lying in the bed of your truck. That number is real, but it tells you nothing about what happens when you hook it between two vehicles and start pulling. What matters at a joint is how hard the bar can pull and what it is pulling against.
To be fair to the textbook, its calculation is a reasonable picture of the middle of a panel, where the concrete is uncracked and the steel runs through it. It just says nothing about the joints, and the joints are the whole point of the detail.
The right formula was on the next page
There is another wrinkle. The table assumes the steel sits at mid-depth, while ACI puts it above mid-depth but below the sawcut, which in a 6-inch (150 mm) slab is about 2 inches (50 mm) from the top. The textbook pages ACI cites cover that case on the next page. Run that version and the restraint at the top surface comes out about double what the table shows. Still small at 0.1%, but it is the number for the detail ACI actually recommends, and it is the version a design guide should show.
Shrinkage has to go somewhere
The table itself says that with 0.1% steel, about 97% of the shrinkage still happens. In a 120-foot (37 m) stretch of 6-inch (150 mm) floor, that adds up to roughly two-thirds of an inch of total movement at typical long-term shrinkage. The bars barely change that total. What they change is which joints it shows up in.
A freight train is a good picture of this. There is a little slack in every coupler. When the engine pulls, each coupler takes up its share. Now weld most of the couplers solid. The train still stretches the same total amount, but all of it shows up at the few couplers that are still free.
That is what tied joints do. If the bars hold the tied sawcuts tight, the shrinkage of the whole stretch gets pushed to the joints that are free to open. In the current guide, those are the doweled joints required at least every 125 feet (38 m), put there "to force activation" when the tied joints do not open.
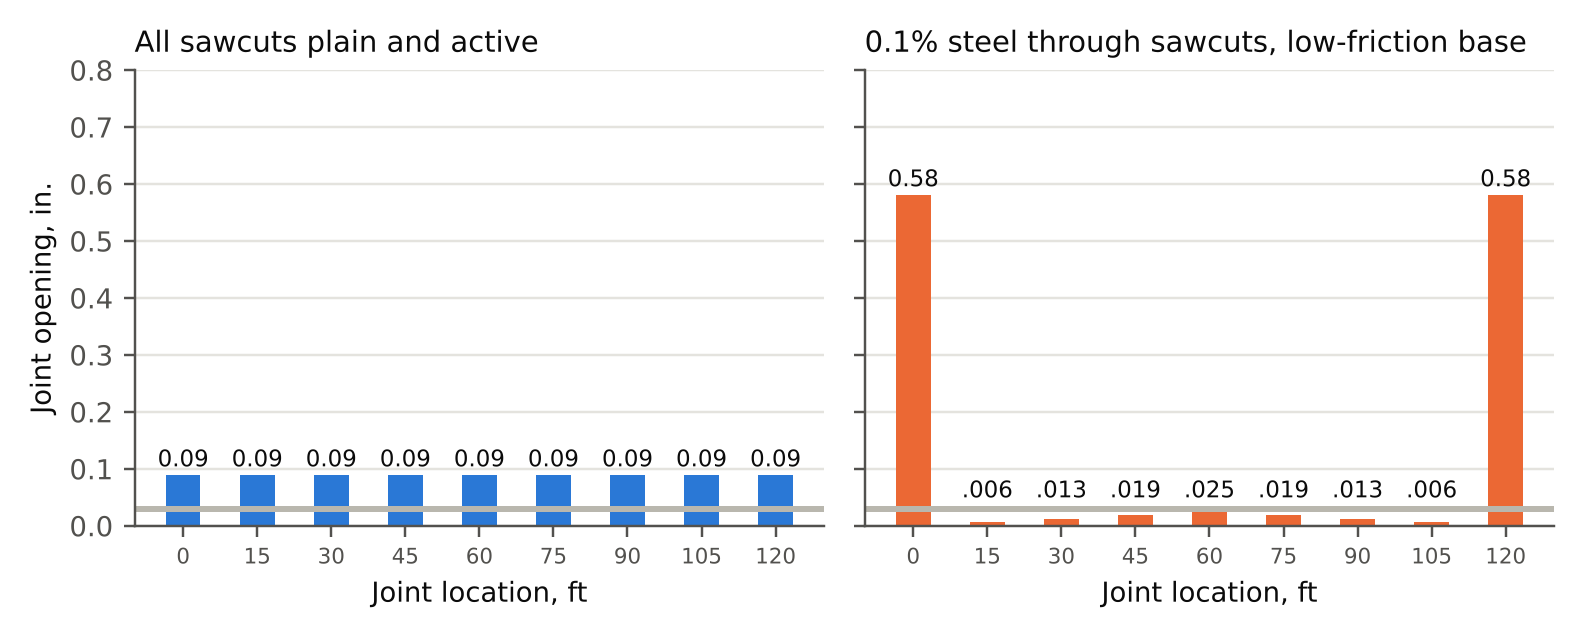
With the 0.1% tied detail on a vapor retarder, the tied joints may stay tight, so the detail looks like it is working, while the doweled construction joints at the ends of the stretch open more than half an inch (Figure 2). Anyone who has walked a building and found a few wide joints with spalled edges and filler pulled loose, surrounded by joints you can barely see, has seen this. Tying the sawcuts does not get rid of dominant joints. It moves them to the doweled joints.
One answer some designers use for wide construction joints is a "hybrid" joint: dowels plus part of the regular steel carried across the construction joint. It sounds like a fix, but think about what that steel does. Before the construction joint can open, its bars have to stretch to their limit, and while they are pulling, they add to the pull on every tied joint in the run. Run the numbers for a 120-foot (37 m) run on a vapor retarder and the middle sawcut joints get pulled past what their own bars can hold. The movement does not go away. Part of it just moves back out into the field, to joints whose bars have already given up.
The bars are stronger than the friction
The guide says the effect of the steel is minor compared with base friction. Do the comparison in pounds and it comes out the other way. In a 6-inch (150 mm) slab, 0.1% Grade 60 steel can carry about 4,300 pounds per foot of width before it yields. On a vapor retarder, the base drags on the slab at about 60 pounds per square foot. On a granular base, the first time the slab moves, the drag is about twice that. So the bars can hold back the drag from roughly 36 to 72 feet (11 to 22 m) of slab, or about two and a half to five panels at 15-foot (4.6 m) spacing. That is not a small effect. And the slicker the base, the more the steel matters, which helps explain why vapor retarders make dominant joints worse.
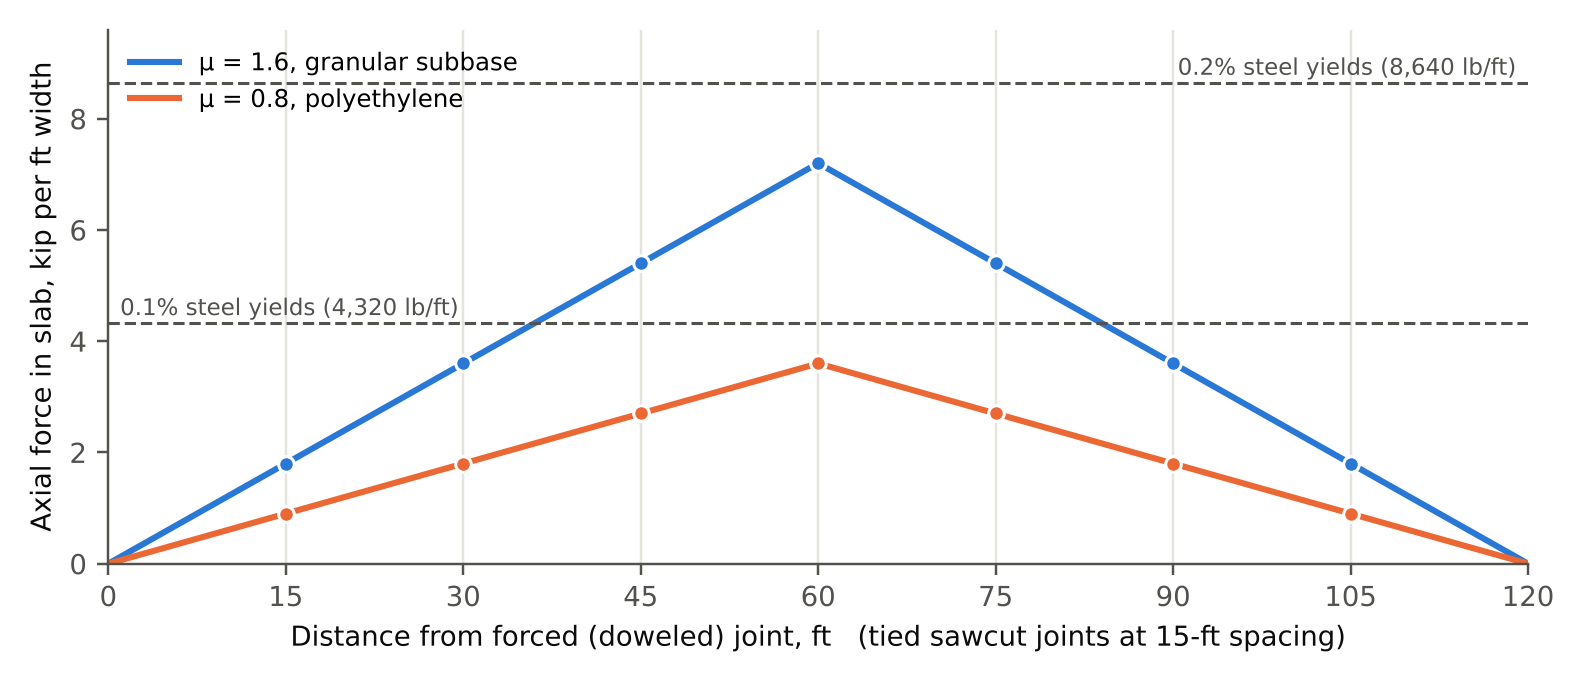
Why heavier steel changes the game
There is a better way to judge how much steel is too much, and it is a simple comparison: how hard can the bars pull compared with how hard it takes to crack the concrete?
Picture a tug-of-war across the joint with a rope. With 0.1% steel, the rope is thin. It stretches and gives up long before it could tear the concrete anywhere else, so the slab still cracks at the sawcuts. Around 0.5% steel, the rope is as strong as the concrete. Now the bars can pull hard enough to crack the slab between the sawcuts. In a continuously reinforced slab that is the goal: at least 0.5% steel makes lots of fine, tight cracks in place of joints, and ACI 360 already uses 0.5% as the line for eliminating sawcut joints. In a jointed floor that was not designed for it, those same cracks show up as random cracking. Table 6.2 in ACI 360R-10, developed from Park and Paulay, doesn't show that line at all. It reports a smooth change in behavior from 0.1% to 1.0% steel, with no hard transition anywhere, which puts it in direct disagreement with Walker and Holland's "Stay Out of the Courthouse Zone" too. Their chart doesn't treat 0.1% as the top of a safe range; it treats exactly 0.1% as the one acceptable point short of 0.5%, with nothing in the mechanics to say why it's 0.1% and not 0.09% or 0.12%.
The table also cannot tell Grade 60 from Grade 80, and Grade 80 bars are showing up in floors. But a joint does not care about percentages; it cares about pounds. At 0.1%, Grade 80 bars pull as hard as Grade 60 bars at about 0.13%, which is inside the range the industry warns against. If you go to Grade 80, the equivalent amount is about 0.075%. And the stress in a tied bar is only low where the pull reaching that joint is low. In the middle of a long run, it can reach yield.
Three ways to measure a joint
Part of why this detail is hard to argue about is that the industry uses three different measures for the same joint, and they sound alike. Picture a wheel sitting right at a joint, and measure how far each side drops under it.
Differential deflection, which ACI 360R-10 calls joint stability, is the difference between the two drops, in thousandths of an inch. It's what the wheel and the joint filler feel. ACI 360R-10 says 0.010 inch (0.25 mm) or less for small hard wheels and 0.020 inch (0.51 mm) for large cushioned ones should give a joint good service life.
Load transfer efficiency, or LTE, is the drop on the unloaded side divided by the drop on the loaded side. If both sides move together, it's 100%. If the far side doesn't move at all, it's 0%, a free edge. LTE is what matters for thickness, because it sets how much the loaded edge has to carry by itself. Even at 100%, the two sides only split the load about evenly, and at 90%, the panel next door carries a bit less than half.
Joint effectiveness is the measure the 1960s PCA tests used: twice the unloaded-side drop divided by the sum of both drops. It always reads higher than LTE.
Here's why the difference matters. Say the loaded side of an undoweled joint drops 0.020 inch (0.51 mm) and the far side drops 0.012 inch (0.30 mm). The differential deflection is 0.008 inch (0.20 mm), which passes the 0.010-inch (0.25 mm) limit, so the joint looks fine in the field. Its joint effectiveness is 75%. But its LTE is 60%, and the loaded edge is carrying far more than it would at a doweled joint, where the two sides might drop 0.012 and 0.011 inch (0.30 and 0.28 mm), for an LTE above 90%. A stiff, thick slab can keep its differential deflection small while passing much less load than a dowel would. Passing a joint stability check is not the same as performing like a doweled joint.
60 percent is not what it sounds like
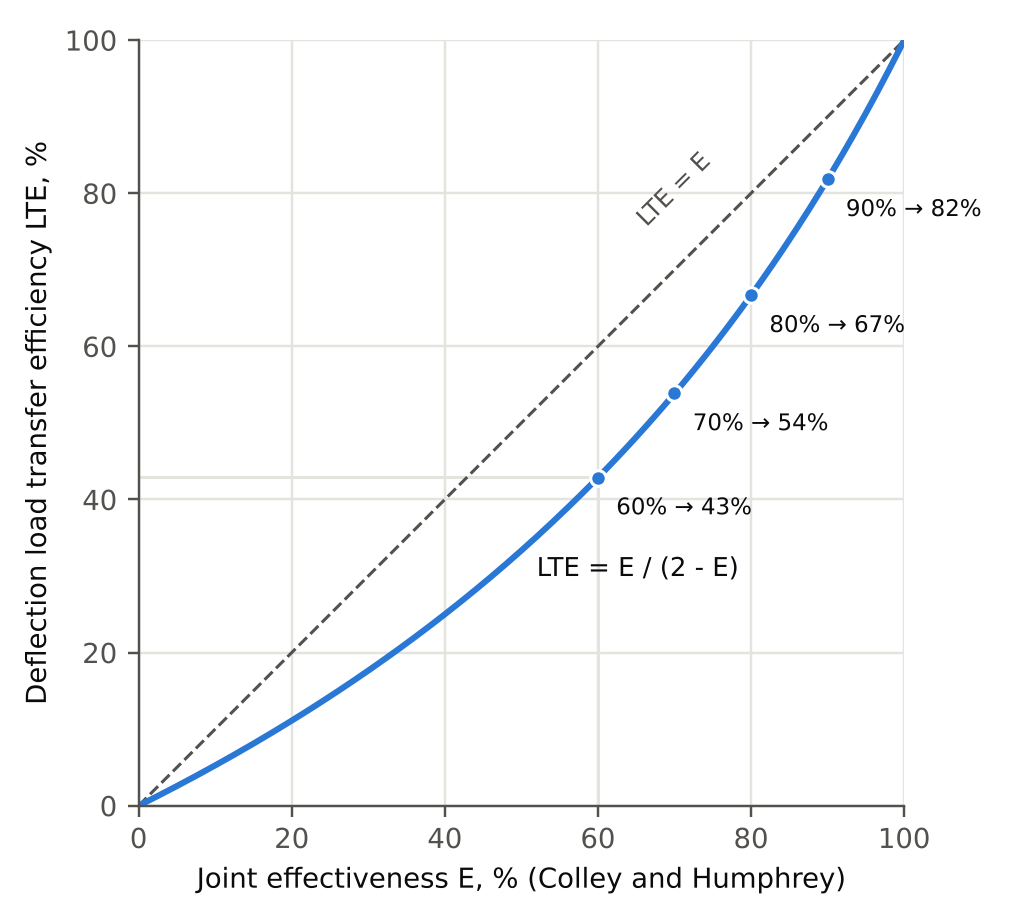
The guide quotes 1960s PCA tests showing that aggregate interlock drops to 60% "joint effectiveness" once a joint opens about 0.025 to 0.035 inch (0.64 to 0.89 mm). Most people today talk about load transfer efficiency, or LTE, and it is easy to read 60% joint effectiveness as 60% LTE. They are not the same thing. (Those 1960s numbers have been in PCA's floor guidance since at least 1983, when Concrete Floors on Ground also called 50% joint effectiveness "an acceptable percentage limit." That's about 33% LTE.)
Joint effectiveness compares the unloaded side of the joint to the average of both sides. LTE compares the unloaded side directly to the loaded side. The conversion works out to LTE = E / (2 - E). Plug in 60% and you get about 43% LTE. So by the time a joint opens to the width ACI warns about, it's passing less than half the deflection across, not 60%. If you're comparing field LTE readings against the old PCA numbers, convert first.
It gets worse when you add traffic. Those 1960s tests also tracked what happened as loads repeated. Re-plot the data as LTE against joint opening, and with repetitions, LTE drops below 90% at just 0.015 inch (0.38 mm) of opening, for both the 7-inch (180 mm) and 9-inch (230 mm) slabs. Pavement engineers design doweled joints for 90%. The extra 2 inches (50 mm) of concrete didn't fix it, and the floor wheels we're talking about are smaller and harder than any truck tire.
Do not design it as if the joints were not there
The last issue may be the most important. ACI 360R-10 presents this detail as a way "to provide load-transfer capability without using dowels," and it gives no separate way to set the slab's thickness. So the thickness comes from the same PCA and WRI charts used for an unreinforced slab. Those charts are for loads in the middle of a panel. They assume the load is nowhere near a joint, which is the same as assuming the joint passes load across perfectly. Put together, a #3 bar every 18 inches (460 mm) is treated as if it did the job of a dowel.
Nothing above supports that. At the joint widths ACI warns about, the old PCA tests show about 43% LTE, not 100%. Tied joints that hold are tight but not perfect, tied joints that yield open wider, and the construction joints open the most of all. A #3 bar every 18 inches (460 mm) is not a dowel; its stiffness across the joint is a tiny fraction of a real dowel's. PCA's own floor manual applies a joint factor of up to 1.6 for loads at joints with no load transfer. Designed with the interior charts, this slab gets no factor at all. If posts or wheels sit at joints, design for the load transfer you will actually get, or dowel those joints.
Here's the part that should be good news. The thicknesses the industry has used for years aren't the problem. They're close to what a doweled slab needs. PCA's own 2008 lift truck example comes out at 180 mm (7 in.) with doweled joints, 205 mm (8 in.) with aggregate interlock, and 235 mm (9.25 in.) at a free edge, with the same truck, concrete, and soil every time. Our spec building comparison came out at 7 inches (180 mm) doweled and 10 inches (250 mm) undoweled. So where an interior-load design framework was used to justify the thickness, a floor with dowels at every joint has a factor of safety much closer to what the engineer of record intended than one without dowels, or one counting on aggregate interlock or light steel. That second floor is quietly eating into its factor of safety. Nobody has to make floors thicker to fix that. The joints have to carry their share.
Then how come it works?
Fair question, and anyone who has placed millions of square feet of these floors will ask it. Plenty of floors built with this detail have done their job, and that experience is real.
But "it worked" and "the design was right" aren't the same thing. An engineer picks a factor of safety to cover what they're unsure about, and a factor of safety of 1.7 to 2.0 on the load stress covers a lot. Concrete usually comes in stronger than specified and keeps gaining strength. Most loads never sit right at a joint at the worst time. And a slab-on-ground carries more than the small beam its strength is measured on.
When the thickness is set as if the joints passed load perfectly, and they actually pass something like 40%, the factor of safety is what pays the difference. The floor doesn't fail. It just has less safety factor than the drawings say, and nobody knows how much less. That's risk, taken on without anyone deciding to take it.
Then something ordinary goes wrong: a slicker base than planned, a hot pour, a rack leg sitting on a dominant joint, a construction joint that opened half an inch. The floor cracks or spalls where the design said it was fine. That's the case I'm making. Not that the 0.1% detail always fails, but that the math behind it is wrong, so we're eating into the safety factor without measuring it. Experience tells us what has worked. It can't tell us how close it came.
Here's where I think we really are. An engineer leans on the factor of safety to cover doubt about the problem. That's what it's for. But once it's easy to show that joint spacing, curl, loss of support, and several loads interacting on one panel change the answer, the doubt isn't unknown anymore. Some engineers hear that and dig in: "this is local engineering practice." Once the gaps are known and the incomplete model is obvious, though, the liability shifts back to the engineer and off of the method. That's where slabs are now. Some of us can see past the oversimplification and the piecewise logic used to cover the gaps, to a slab that behaves as a system with connected behaviors. Others are still pulling one or two levers at a time. And a few are happy to profit from the smoke and mirrors in a niche with too few fully invested engineers to tip it quickly. Some of us are here, though, and ready to be heard.
"We've done it for years" is real experience, and I'm not here to dismiss it. But it's trial and error, and trial and error is only as good as the history behind it. It holds as long as the conditions match that history, and the conditions keep changing. Lift trucks went from pneumatic tires to small, hard polyurethane wheels. Robots now drive the same wheel path all day, and whatever walks or rolls across floors next will be different again. Cements are ground finer and blended differently than they were, which changes how concrete shrinks and curls. Every change moves a floor a little further from the history that said it would be fine, and experience can't tell you how far.
The highway industry went through exactly this with jointed reinforced pavement. It worked, well enough that local engineers defended it hard. The conversation only moved when someone got past "it worked" to "but not as well as the alternatives," by comparing performance data across pavement types. Floors deserve the same bar. When someone proposes a modern mechanistic-empirical dowel design, the industry rightly asks for data and models. That bar shouldn't apply to one part of the slab system and not the rest. Joints that rely on aggregate interlock or light steel should be held to it too.
What this means on your next project
None of this means the 0.1% detail is a bad idea. It means the detail shifts movement from one joint to another, and the wide joints need to be planned for rather than discovered after the racks go in. A few practical points:
First, expect the construction joints in a tied layout to open much wider than a typical sawcut. Size the dowels, the armoring, and the joint filler for that movement, and do not assume the tied joints tell you anything about them.
Second, pay attention to the base. A slick vapor retarder makes it more likely that tied joints stay closed and the movement piles up at the free joints. A rougher base spreads it out more.
Third, be careful with heavier steel. Once the bars can pull harder than the concrete can resist, you should expect cracks between joints unless the slab is designed as a continuously reinforced floor.
Fourth, if you use Grade 80 bars, reduce the steel to about 0.075%. The joint feels the pull, not the percentage. And if you use hybrid construction joints, check what the extra pull does to the sawcut joints next to them.
Fifth, design the thickness for the load transfer you will really get at the joints, not for a load in the middle of the panel. Where posts or wheels sit on joints, that may mean dowels.
Finally, ask for joint opening estimates. ACI 360 already says that when aggregate interlock is the only load transfer, the joint spacing should come from an evaluation of how wide the joints will actually open. That takes a model of the whole run of panels, including the base drag, the joint types, and where the free joints are. Tools now exist that do this for a specific floor layout, including JOINTS, which my company developed. A table built for a single uncracked piece of concrete cannot give you that number.
One more thing to keep in mind: a percentage on the drawings is not a percentage in the floor. A 6-inch (150 mm) slab designed at exactly 0.1% steel is at about 0.11% wherever it is 3/4 inch (19 mm) thin, which ACI 117 allows. And highway engineers built this same layout, light steel holding cracks between widely spaced doweled joints, for decades before moving away from it. Both are the subject of The Roads Already Ran the 0.1% Experiment, the next article in this series.
Sources
ACI Committee 360, ACI 360R-10, Guide to Design of Slabs-on-Ground, American Concrete Institute, 2010.
Colley, B. E., and Humphrey, H. A., "Aggregate Interlock at Joints in Concrete Pavements," Highway Research Record 189, 1967.
Spears, R. E., and Panarese, W. C., Concrete Floors on Ground, EB075.02D, second edition, Portland Cement Association, Skokie, IL, 1983.
Farny, J. A., and Tarr, S. M., Concrete Floors on Ground, EB075, 4th ed., Portland Cement Association, 2008.
Park, R., and Paulay, T., Reinforced Concrete Structures, John Wiley & Sons, 1975.
Walker, W. W., and Holland, J. A., "Stay Out of the Courthouse Zone," Engineering Bulletin, Structural Services, Inc., 2016.
Related in This Series
- Technical paper on this topic: Reinforcement Continued Through Sawcut Contraction Joints
Shows the section-level solution behind the 0.1% limit does not address force transfer across a joint or redistribution of opening.
- The Roads Already Ran the 0.1% Experiment
Light steel through the joints has a name in highway engineering, and most DOTs stopped building it decades ago.
- Spec Building Floors: Why Undoweled, Doweled, and 0.1% Steel Slabs Should Not Share One Thickness
The joint detail changes how thick a spec building slab needs to be, and the cost numbers say doweling pays.
- Two Promises in the Floor Design Guide That Curling Breaks
The guide says its joint spacing keeps curl low and its factor of safety covers the rest. Its own numbers say otherwise.
- Your Warehouse Floor Is Not a Runway
Why an airport design method ended up sizing forklift floors, and why matching inputs is not the same as matching the problem.
Revision history
- November 4, 2026: Added ACI's Table 6.2 and clarified the Courthouse Zone point.
- November 3, 2026: Completed references; added metric units and links to other pieces in the series.
- November 2, 2026: Added an explanation of differential deflection, LTE, and joint effectiveness; the thickness point; and why experience alone isn't enough.
- October 30, 2026: First published on slabs.design/knowledge.
To cite this article, use the citation printed in the PDF. It includes the revision date, so readers can match your citation to the text you read.